
There’s nothing quite like the warm, inviting scent of freshly baked bread wafting through the house, bringing everyone together. If you’re looking for a quick and exciting way to indulge your homemade cravings, then this 30-Minute Air Fryer Bread is just the answer! Not only does it yield a soft and fluffy masterpiece with a perfect golden crust, but it’s also incredibly beginner-friendly. With just a few simple ingredients and minimal fuss, you can channel your inner baker and impress friends and family—no long rise times required. Perfect for busy weeknights or leisurely weekend brunches, you might find yourself whipping up this small-batch delight more often than you think! What flavors will you create with your first loaf?
Why Try This Air Fryer Bread Recipe?
Quick Satisfaction: In just 30 minutes, you can have warm, homemade bread ready to enjoy.
Endless Variations: With options like garlic, cheesy, or sweet versions, there’s a flavor for everyone’s palate.
Beginner-Friendly: Ideal for novice bakers, this recipe requires minimal skills and simple ingredients.
Time-Saving Solution: Skip the oven and embrace the air fryer for a fast yet delightful baking experience.
Perfect for Any Occasion: Whether it’s a weeknight dinner or a weekend brunch, this bread is sure to impress your family and friends. Don’t forget to pair it with some delicious butter or your favorite jam! If you’re looking for more cozy baked goods, how about trying out some Orange Cranberry Shortbread for a sweet treat?
Air Fryer Bread Ingredients
• Discover the key ingredients for a delightful homemade loaf!
For the Bread
- All-Purpose Flour – The backbone of this bread, offering a soft structure; for a denser loaf, try whole wheat flour.
- Instant Yeast – Speeds up fermentation, crucial for a quick rise; make sure it’s fresh for best results.
- Salt – Enhances the bread’s flavor; can be adjusted for low-sodium diets if desired.
- Sugar – Promotes a golden crust and balances flavors; feel free to substitute with honey for a natural sweetness.
- Warm Water (110°F) – Activates the yeast; the right temperature is essential—too hot will kill the yeast.
- Olive Oil – Adds moisture for a tender crumb; melted butter could be a tasty substitute.
Enjoy crafting your Air Fryer Bread and let your kitchen fill with wonderful aromas!
Step‑by‑Step Instructions for Air Fryer Bread
Step 1: Combine Dry Ingredients
In a medium mixing bowl, whisk together 2 cups of all-purpose flour, 2 teaspoons of instant yeast, 1 teaspoon of salt, and 1 tablespoon of sugar until well-blended. This step ensures all your dry ingredients are evenly incorporated, which contributes to the perfect texture of your Air Fryer Bread.
Step 2: Add Wet Ingredients
Gradually pour in ¾ cup of warm water (around 110°F) and 1 tablespoon of olive oil into the dry mixture. Stir with a wooden spoon or spatula until the dough begins to come together, forming a rough, sticky ball. Make sure to scrape down the sides of the bowl as you mix for uniformity.
Step 3: Knead the Dough
Transfer the dough onto a lightly floured surface. Knead the dough for about 5 minutes until it feels smooth and elastic, achieving that perfect consistency. This step is essential for developing gluten, which gives your Air Fryer Bread its delightful texture.
Step 4: Rest the Dough
Shape the kneaded dough into a ball, placing it back into the mixing bowl. Cover the bowl with a clean kitchen towel and let it rest for 10-15 minutes. This short resting period allows for a quick rise, helping the bread to become light and airy.
Step 5: Shape the Loaf
Once rested, gently remove the dough from the bowl and roll it into a loaf shape that fits nicely into your air fryer basket. Aim for a size of approximately 8 inches long, ensuring it isn’t tightly packed, so it can expand while baking.
Step 6: Prepare Air Fryer
Line the air fryer basket with parchment paper or lightly brush it with oil to prevent sticking. Carefully place the shaped dough into the basket, making sure there’s enough space around it for hot air circulation, which is crucial for an even bake.
Step 7: Bake the Bread
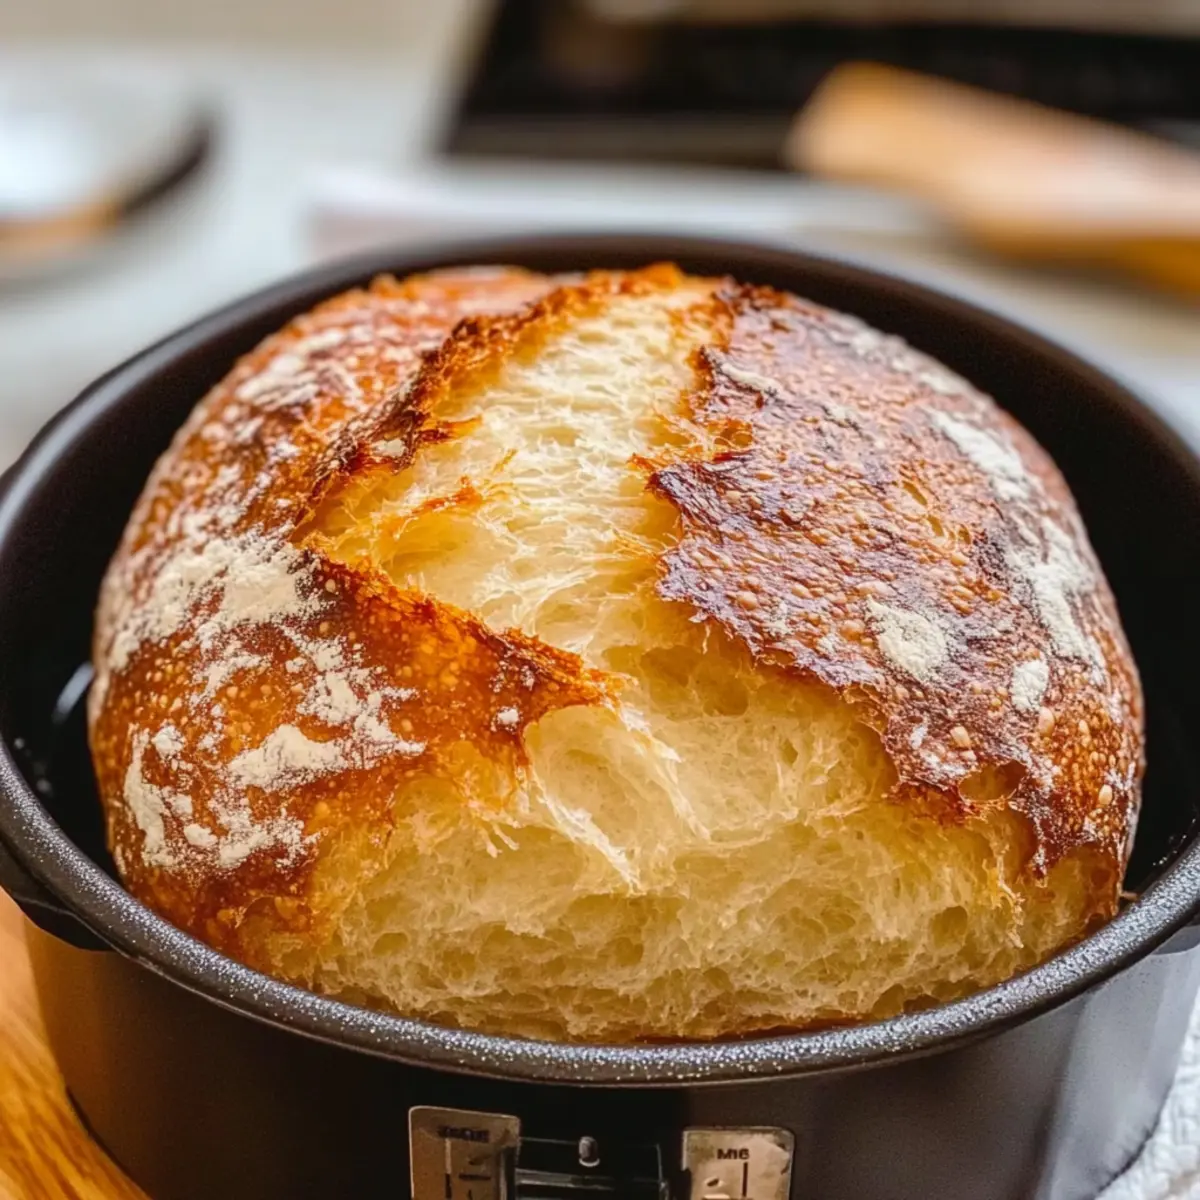
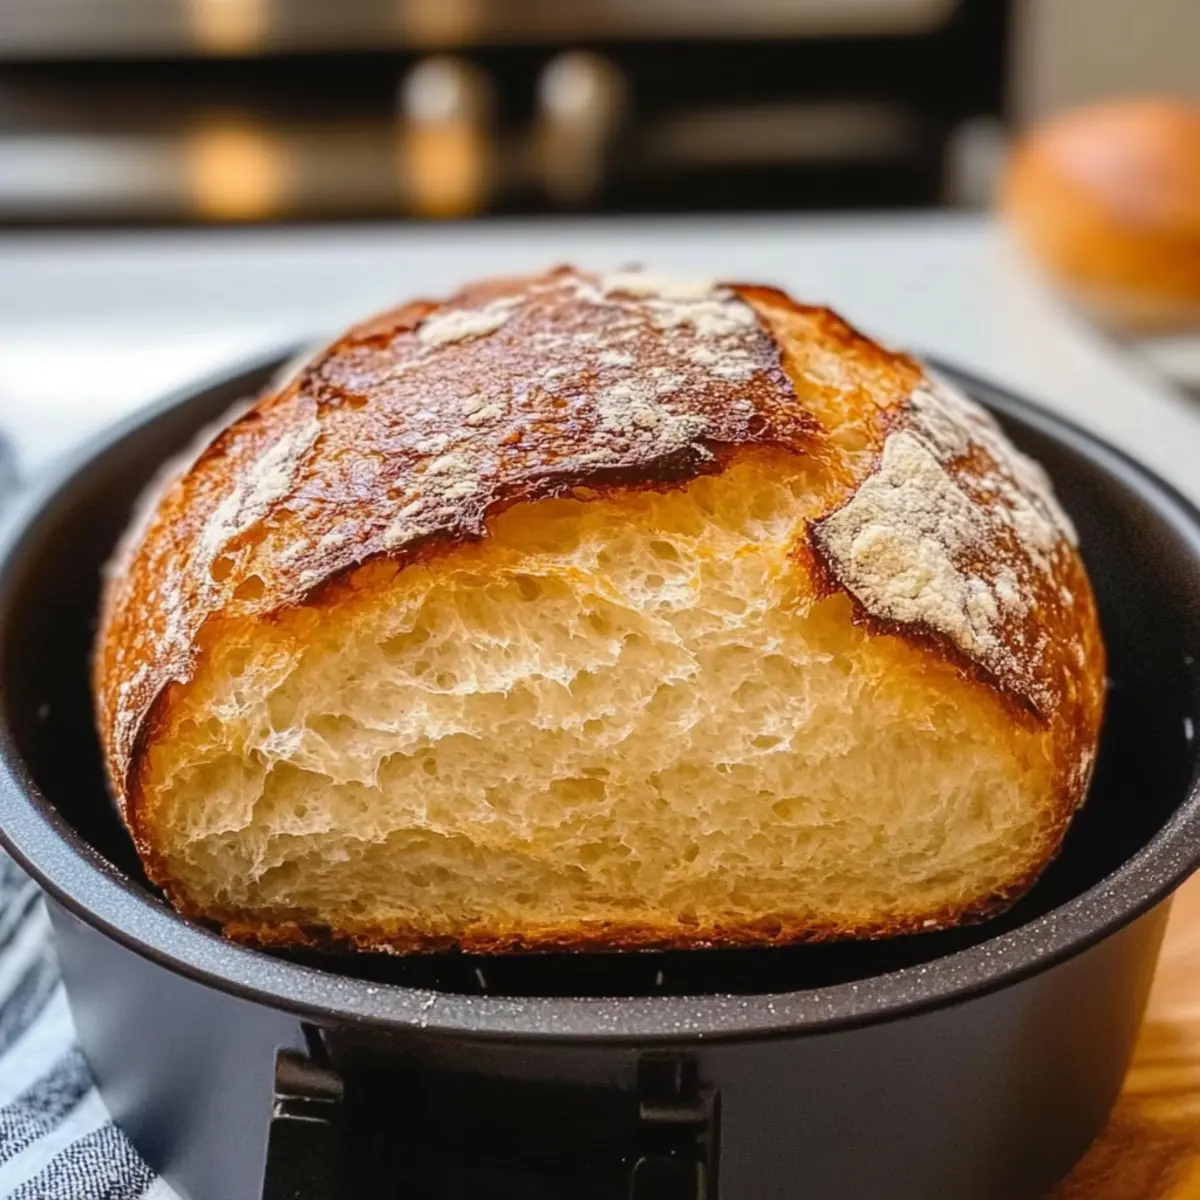
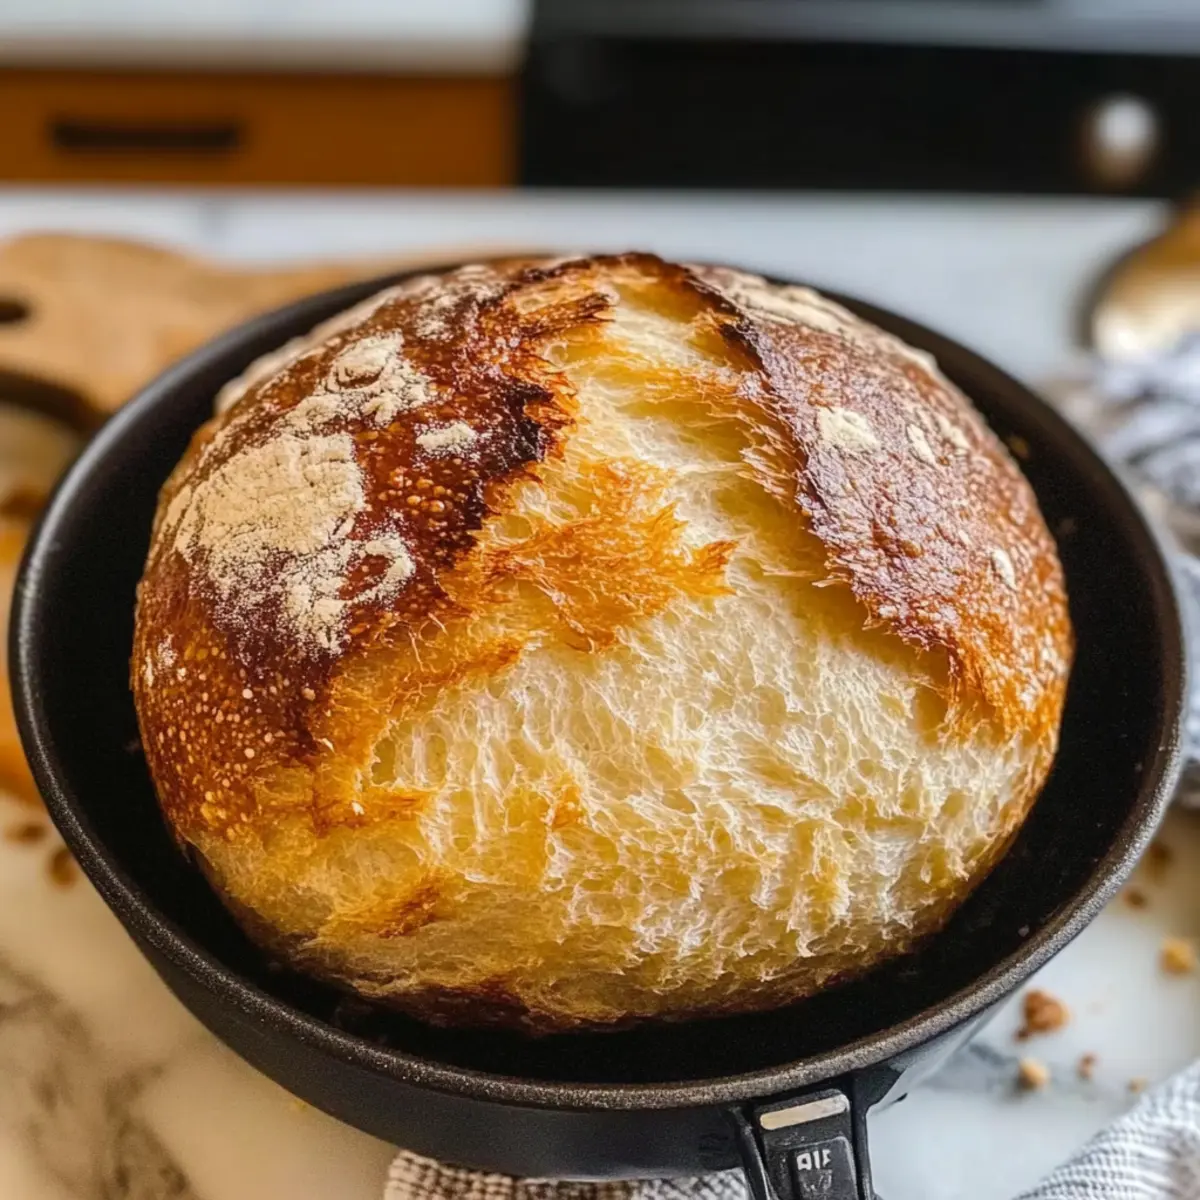
Set your air fryer to 330°F (165°C) and bake for 15-18 minutes. Keep an eye on the bread, and look for a golden, crisp crust. It’s done when it sounds hollow when tapped gently on the bottom.
Step 8: Cool the Bread
Remove the hot bread from the air fryer and transfer it to a wire rack. Allow it to cool for 5-10 minutes, helping to maintain its soft texture inside while the crust sets perfectly. After cooling, slice and savor your homemade Air Fryer Bread!
How to Store and Freeze Air Fryer Bread
Room Temperature: Store leftover Air Fryer Bread in an airtight container for up to 2 days to maintain freshness and texture. Avoid direct sunlight.
Fridge: If you need to store it longer, refrigerate the bread in a sealed bag for up to 5 days. However, this may slightly change the texture.
Freezer: For the best long-term storage, wrap slices tightly in plastic wrap and place in a freezer bag. It can be frozen for up to 2 months.
Reheating: When ready to enjoy, reheat frozen slices in the air fryer at 300°F (150°C) for about 5 minutes to restore crispiness.
Air Fryer Bread Variations & Substitutions
Customize your Air Fryer Bread with these delightful twists that will surely inspire your taste buds!
-
Herb Bread: Add herbs like rosemary or thyme to the dough for an aromatic boost. Fresh herbs elevate the flavor, making each bite a delightful experience.
-
Garlic Bread: Mix in garlic powder or freshly minced garlic before shaping. The toasty garlic flavor infuses the bread, perfect for garlic lovers.
-
Cheesy Loaf: Incorporate shredded cheese such as mozzarella or cheddar into the dough. The melted cheese creates gooey pockets of deliciousness throughout the loaf.
-
Sweet Version: Substitute olive oil with melted butter, adding extra sugar and a sprinkle of cinnamon sugar on top. This creates a delightful sweet crust, perfect for breakfast or dessert.
-
Spicy Kick: Stir in red pepper flakes or chopped jalapeños for a zesty kick. This twist will wake up your taste buds and add a fun heat element.
-
Whole Wheat: Swap all-purpose flour for whole wheat for a nutty flavor and extra fiber. This substitution gives your bread added nutrition without sacrificing taste.
-
Nutty Surprise: Fold in chopped nuts, like walnuts or pecans, for texture and flavor. This option adds crunch and a delightful surprise to each slice.
-
Fruit-Infused: Mix in dried fruits like cranberries or raisins for a sweet and chewy texture. Serve this version as a delightful side for soups or with a drizzle of honey for a snack.
Every variation turns your basic Air Fryer Bread into something truly special. Pair it with a warm dip or spread, and enjoy the endless possibilities! If you’re looking for a sweet treat to accompany your bread, consider making some Orange Cranberry Shortbread—it’s the perfect complement!
Make Ahead Options
These Air Fryer Bread loaves are perfect for busy cooks looking to save time without sacrificing flavor! You can prepare the dough up to 24 hours in advance. Simply follow the steps until the resting stage, then cover the bowl tightly and refrigerate the dough. This short chilling period helps develop flavor and keeps the texture just as delightful once baked. When you’re ready to enjoy your homemade bread, take the dough out of the fridge and allow it to sit at room temperature for about 30 minutes before shaping and baking. This way, you’ll have fresh, warm bread ready with minimal last-minute effort—ideal for family dinners or brunch gatherings!
What to Serve with 30-Minute Air Fryer Bread?
Imagine the warmth of freshly baked bread gracing your dinner table, inviting everyone to gather around and enjoy a cozy meal together.
-
Creamy Tomato Soup: The acidity and richness of tomato soup perfectly balance the fluffy bread, creating a comforting pairing.
-
Garlic Herb Dip: This rich, flavorful dip complements the bread’s texture beautifully, making each bite savory and delicious.
-
Fresh Garden Salad: A refreshing salad with crisp vegetables adds a delightful crunch, enhancing the overall meal experience.
-
Cheesy Pasta Bake: The warmth and gooeyness of melted cheese in a pasta dish adds indulgent comfort that pairs wonderfully with warm bread.
-
Savory Stews: Hearty stews provide depth and substance, and you’ll love mopping up the gravy with slices of your homemade loaf.
-
Hummus and Veggies: A healthy and vibrant snack makes for a great appetizer, serving as a dip or spread on slices of fresh bread.
-
Sweet Honey Butter: Spread a dollop of this delightful topping on warm slices for a sweet twist that will bring smiles to everyone at the table.
-
Sparkling Lemonade: A refreshing drink for balancing the warm, cozy atmosphere of your meal, enhancing the homemade dining experience.
Dive into the delightful world of flavors that beautifully complement your Air Fryer Bread, making every meal memorable!
Tips for the Best Air Fryer Bread
Temperature Check: Ensure your warm water is around 110°F. Water that’s too hot can kill the yeast, resulting in a dense loaf.
Yeast Matters: Always check the freshness of your instant yeast. Expired yeast won’t activate properly and will lead to disappointing results.
Watch the Time: Since air fryers can vary, start checking your bread around the 12-minute mark. Cover with foil if it browns too quickly.
Kneading Techniques: Proper kneading for about 5 minutes is essential for gluten development, which gives your Air Fryer Bread its airy texture.
Storage Tips: Keep leftovers in an airtight container for up to 2 days. For longer storage, freeze slices and reheat in the air fryer to maintain its freshness.
Air Fryer Bread Recipe FAQs
What type of flour is best for Air Fryer Bread?
I recommend using all-purpose flour for a soft and airy texture. If you’re looking for a denser loaf, whole wheat flour is a great alternative, but remember that it may require a bit more water due to its higher absorbency.
How should I store leftover Air Fryer Bread?
Store any leftover bread in an airtight container at room temperature for up to 2 days. If you want to keep it fresh for a longer period, you can refrigerate it for up to 5 days. Just keep in mind that refrigeration may change the texture slightly.
Can I freeze Air Fryer Bread?
Absolutely! For freezing, wrap slices tightly in plastic wrap and place them in a freezer bag. The bread can be stored in the freezer for up to 2 months. When you’re ready to enjoy, simply reheat the slices in the air fryer at 300°F (150°C) for about 5 minutes to restore their crispy crust.
What should I do if my bread turns out dense?
If your bread is dense, first ensure your yeast was fresh and active. Check that your warm water was around 110°F—too hot can kill the yeast. Additionally, kneading until smooth and elastic is crucial for gluten development, as this helps create the airy structure you desire.
Are there any dietary considerations I should know about?
Yes, when making Air Fryer Bread, be mindful of allergies. The main ingredients include flour and yeast, so if anyone has gluten sensitivities or allergies, you could try a gluten-free flour mix. Always check labels if you’re using pre-packaged ingredients to avoid hidden allergens.

Air Fryer Bread: Easy 30-Minute Homemade Delight
Ingredients
Equipment
Method
- In a medium mixing bowl, whisk together 2 cups of all-purpose flour, 2 teaspoons of instant yeast, 1 teaspoon of salt, and 1 tablespoon of sugar until well-blended.
- Gradually pour in ¾ cup of warm water and 1 tablespoon of olive oil into the dry mixture. Stir until the dough begins to come together.
- Transfer the dough onto a lightly floured surface. Knead for about 5 minutes until smooth and elastic.
- Shape the kneaded dough into a ball, place it back into the mixing bowl, cover with a towel, and let it rest for 10-15 minutes.
- Gently remove the dough and roll it into a loaf shape about 8 inches long.
- Line the air fryer basket with parchment paper or brush with oil. Place the shaped dough into the basket.
- Set air fryer to 330°F and bake for 15-18 minutes, checking for a golden crust.
- Remove from air fryer and transfer to a wire rack. Cool for 5-10 minutes before slicing.
Leave a Reply