
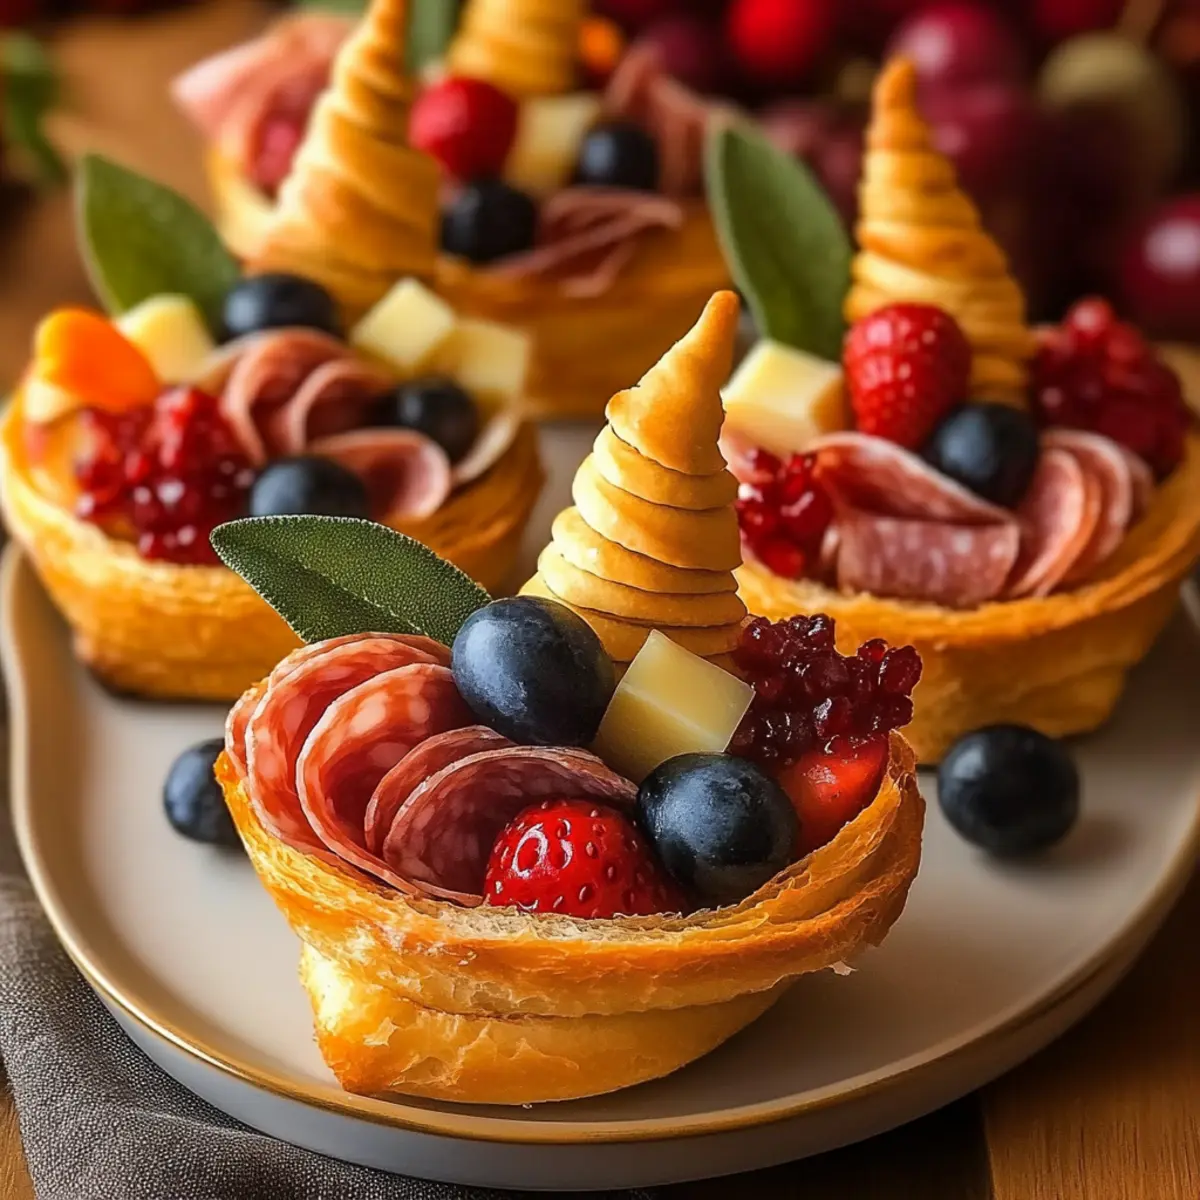
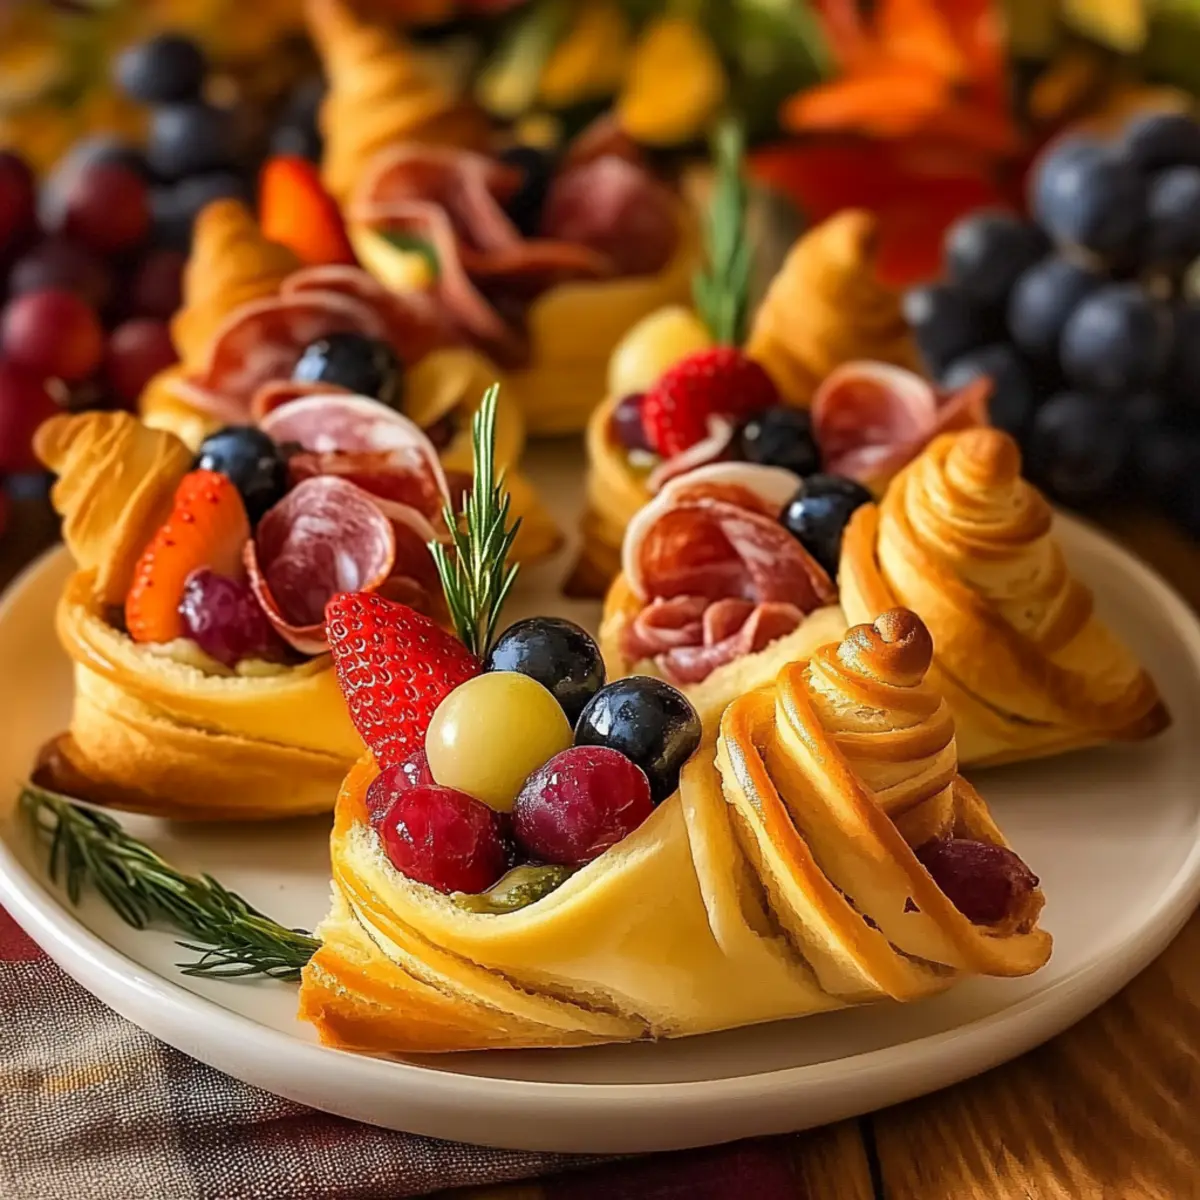
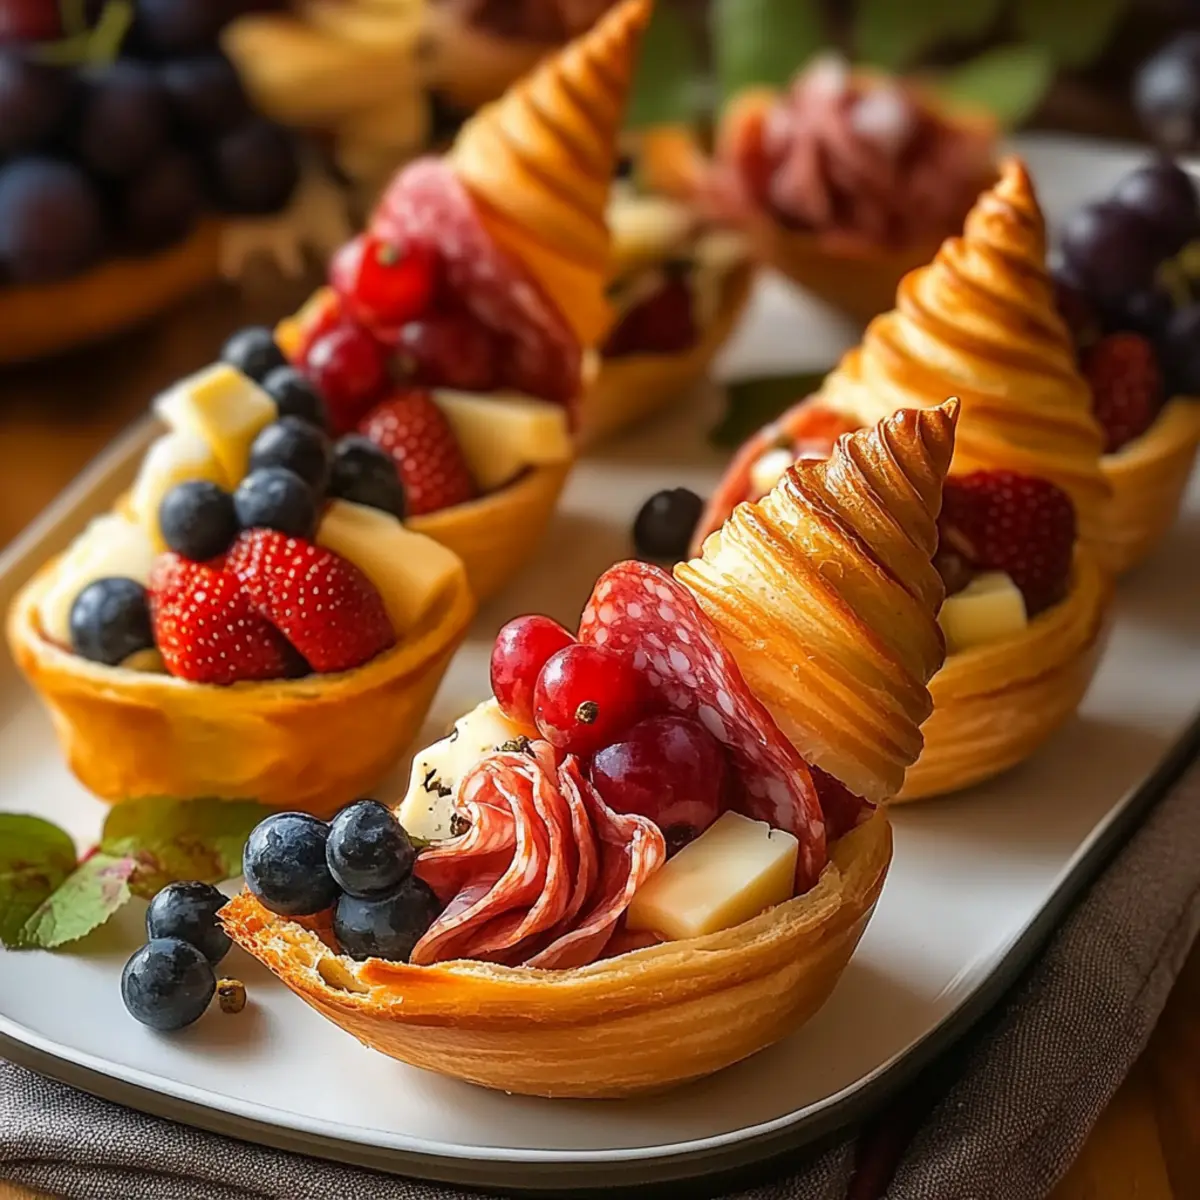
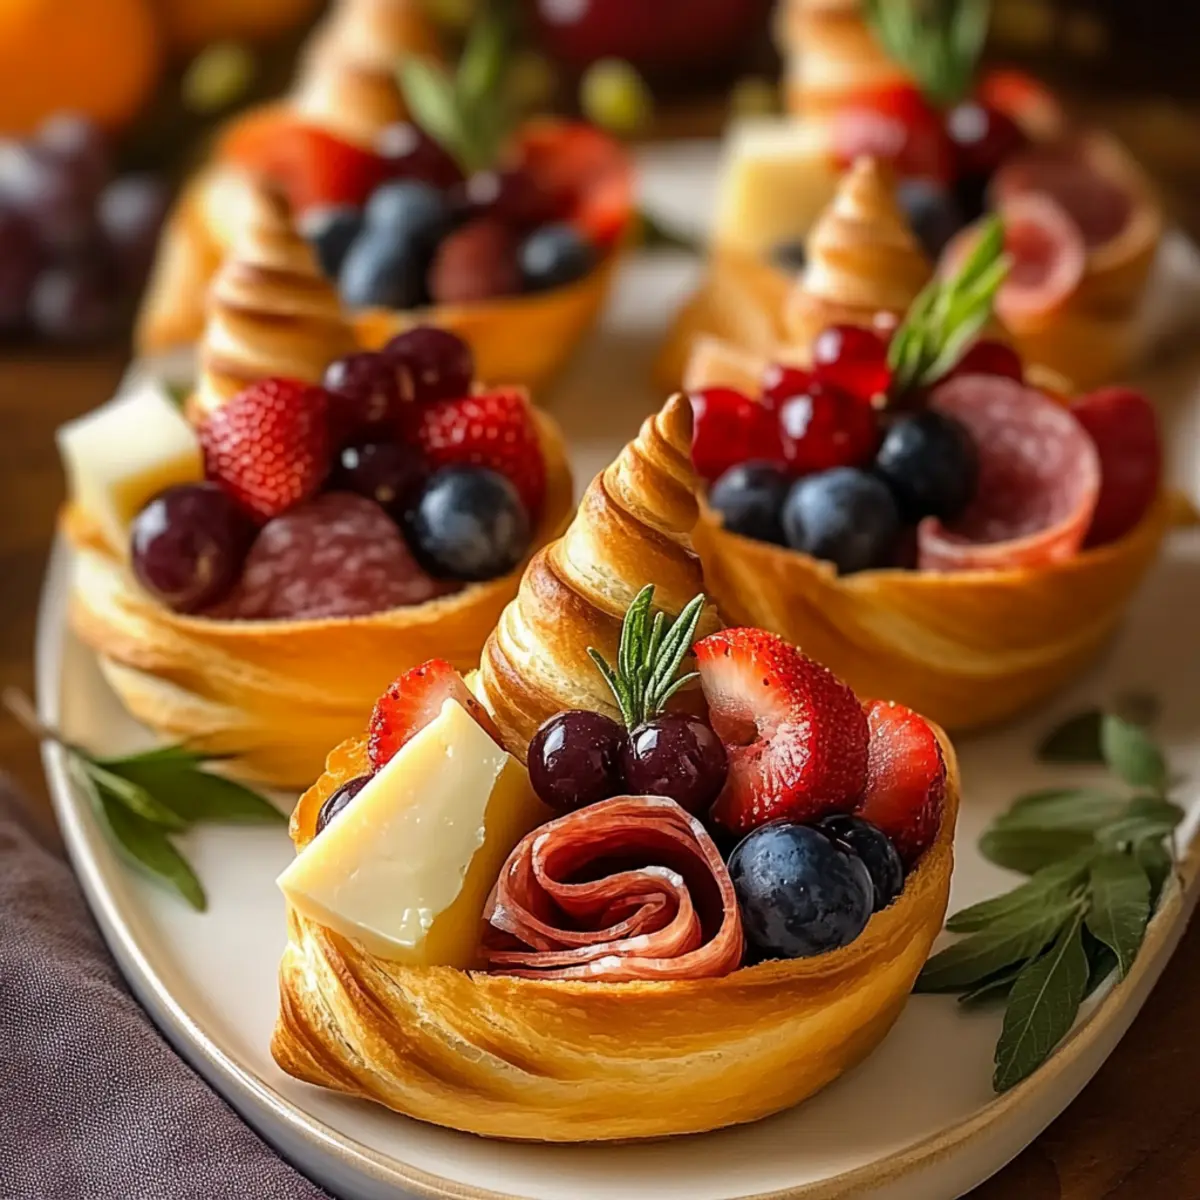
Amid the hustle and bustle of holiday preparation, I stumbled upon a magnificent creation—cornucopia charcuterie cups that are as impressive as they are delicious! These charming edible vessels, crafted from crispy bread, are more than just an appetizer; they encapsulate the rich flavors of Thanksgiving with savory meats, creamy cheeses, and a colorful array of fruits. Not only are these Ultimate Cornucopia Charcuterie Cups easy to whip up, but they also add a fun twist to your holiday table, making them a crowd-pleaser that everyone will adore. Imagine how thrilled your guests will be as they indulge in these delightful bites that look striking and taste divine. Are you ready to elevate your Thanksgiving festivities with an appetizer that’s sure to spark joyful conversations?
Why Will You Love These Cups?
Delightful Presentation: These cornucopia cups not only taste amazing but also create an eye-catching centerpiece for your holiday table.
Easy to Make: With just a few simple steps, you can whip up these impressive appetizers, freeing you up for other holiday preparations.
Flavorful Variety: Choose from a mix of cheeses, meats, and seasonal fruits, allowing you to customize each cup to suit your guests’ tastes—try swapping in some herbs or adding roasted vegetables for a twist.
Make-Ahead Magic: Prepare the bread shells ahead of time and fill them just before serving, ensuring they stay crispy and fresh—perfect for busy holiday hosts.
Crowd-Pleasing Appeal: Everyone loves a charcuterie board, and these individual cups take it up a notch, offering a fun, interactive way for guests to enjoy their appetizers. If you love creative bites, check out the delicious Chicken Bacon Ranch for another festive idea!
Ultimate Cornucopia Charcuterie Cups Ingredients
For the Cornucopia Shells
- Refrigerated French Bread Dough – Forms the delightful crispy cups; if unavailable, canned pizza dough works just as well.
- Egg (for egg wash) – Gives the bread a gorgeous golden color; avoid substitutions for the best visual appeal.
- Cooking Spray – Essential for preventing sticking to the molds; apply generously for smooth removal.
- Aluminum Foil – This is crucial for creating the conical shape of the cornucopias; it’s a must-have for structure.
For the Filling
- Cheeses – Use Pesto Monterey Jack, sharp cheddar, or creamy brie to create a flavorful mix—feel free to mix and match for variety.
- Meats – Pepperoni and salami are classic choices that add savory richness; any deli meat can be a tasty alternative.
- Fruits – Grapes, blueberries, blackberries, and quartered strawberries offer freshness; seasonal favorites can be substituted too.
- Nuts – Roasted and salted pistachios or almonds bring crunch; simply omit if nut allergies are a concern.
- Fresh Herbs – Sage and rosemary not only taste great but also enhance presentation; other herbs like thyme can work wonderfully too.
Get ready to impress your holiday guests with these Ultimate Cornucopia Charcuterie Cups that are both delicious and visually stunning!
Step‑by‑Step Instructions for Ultimate Cornucopia Charcuterie Cups
Step 1: Prepare Dough
Roll out the refrigerated French bread dough on a lightly floured surface. Cut it into long strips, about ¼ inch wide, ensuring they are uniform in size for even cooking. These strips will be the foundation of your Ultimate Cornucopia Charcuterie Cups, adding a delightful crispy texture.
Step 2: Mold Cornucopias
Using aluminum foil, shape it into cone-like molds to form your cornucopias. Make sure each mold is secure and tall enough to hold the filling. Generously spray the inside of each foil mold with cooking spray to ensure your cornucopia cups release easily after baking.
Step 3: Wrap Dough
Start wrapping the dough strips around the molds from the tip upward, overlapping each strip slightly as you go. Aim for a spiral effect that adds texture to the cups and finish with a decorative twisted rim at the top. This step will enhance both the appearance and the sturdiness of your Ultimate Cornucopia Charcuterie Cups.
Step 4: Egg Wash
In a small bowl, beat one egg with a tablespoon of water to create the egg wash. Carefully brush this mixture over the wrapped dough, which will give your cornucopias a beautiful golden-brown finish once cooked. This step is essential for achieving that mouthwatering look.
Step 5: Cook
Preheat your air fryer to 325°F (160°C), ensuring it’s hot before placing your cornucopias inside. Arrange the molds in the air fryer basket, making sure they do not touch. Cook them for 6-7 minutes until they turn golden brown and are fully cooked. Keep an eye on them for optimal doneness.
Step 6: Cool & Unmold
Once cooked, carefully remove the cornucopias from the air fryer and allow them to cool completely on a wire rack. This cooling process is crucial; it helps them maintain their structure and ensures they are easy to remove from the foil molds without breaking.
Step 7: Fill & Serve
Now it’s time to fill your Ultimate Cornucopia Charcuterie Cups. Start by adding your choice of cured meats, artisan cheeses, and seasonal fruits. You can also sprinkle in some nuts for crunch and garnish with fresh herbs for that extra touch. Serve them on a festive platter for an impressive holiday appetizer!
Storage Tips for Ultimate Cornucopia Charcuterie Cups
Room Temperature: If serving immediately, keep the filled cornucopia cups at room temperature for up to 2 hours. This prevents sogginess and maintains a delightful crunch.
Fridge: Store any leftover cornucopia cups in an airtight container in the fridge for up to 3 days. Fill them with meats and cheeses just before serving to keep the bread crispy.
Freezer: If you want to prepare the cornucopia shells ahead, freeze unfilled cups in a single layer for up to 1 month. Thaw in the fridge before filling and serving.
Reheating: To refresh filled cups, preheat the oven to 350°F (175°C) and heat for about 5 minutes. Do not microwave, as it may make the bread chewy instead of crispy.
Ultimate Cornucopia Charcuterie Cups Variations
Feel free to customize your cornucopia cups for a delightful twist that suits your taste!
-
Cheese Swap: Replace cheese types for varied flavors—try tangy goat cheese or crumbly feta for something unique. Mixing creaminess can elevate the entire experience!
-
Fruit Medley: Add slices of crisp apples or dried cranberries for a touch of seasonal flair. This can bring new textures and tastes, making every bite a delightful surprise.
-
Vegetarian Option: Incorporate roasted seasonal vegetables or flavored hummus for a vegetarian-friendly version. Creating layers of roasted veggies not only looks stunning but also adds rich flavors.
-
Gourmet Touch: Experiment with flavored meats, like cracked pepper salami or smoked turkey, for an upscale twist. Lovely options like this will definitely intrigue your guests.
-
Nuts Galore: Try different nuts, or omit them altogether for a nut-free variation. Roasted sunflower seeds can be a delicious crunchy alternative when you want to avoid allergens.
-
Herb Infusion: Instead of just sage or rosemary, mix in fragrant herbs like basil or oregano for an aromatic punch. Fresh herbs can brighten these cups and enhance their visual appeal.
-
Spiced Up: Add a sprinkle of red pepper flakes or a dash of hot honey to spice things up! This adds a fun heat that can elevate the flavors and surprise your palate.
-
Dairy-Free Friendly: Use plant-based cheese alternatives and skip the dairy for a delightful dairy-free version of these cups. Your guests will love the inclusivity of your holiday spread!
If you’re on the lookout for more delightful ideas, check out my scrumptious Mini Chicken Pot Pies for another fun holiday treat, or perhaps indulge in some Butter Roast Turkey for a festive main course!
Expert Tips for Ultimate Cornucopia Charcuterie Cups
-
Mold Preparation: Always ensure your aluminum foil molds are tightly formed and generously sprayed with cooking spray to prevent sticking, ensuring a perfect release for your cornucopias.
-
Dough Strips: Cut your dough strips uniformly for even cooking. Thin strips will yield a crispier cup, while thicker ones may not cook through properly, impacting the texture of your Ultimate Cornucopia Charcuterie Cups.
-
Cooling Time: Allow the cornucopias to cool completely before unmolding. This will help them maintain their shape and prevent them from collapsing under the weight of the fillings.
-
Filling Variety: Get creative with your fillings! Besides traditional meats and cheeses, consider adding roasted veggies or even dips for unique twists that will impress your guests.
-
Storage Tips: Prepare and cool the cornucopia shells a day in advance, storing them in an airtight container. This make-ahead magic allows you to fill them fresh before serving, maintaining their delightful crunch.
Make Ahead Options
These Ultimate Cornucopia Charcuterie Cups are perfect for meal prep, allowing you to save time on the day of your gathering! You can prepare the cornucopia shells up to 24 hours in advance and store them in an airtight container to maintain their crispness. Simply cook the shells as directed, let them cool completely, and then carefully unroll from the molds. For the filling, you can chop and mix your selected cheeses, meats, and fruits a few hours before serving; just remember to refrigerate them until you’re ready to fill the cups. Finally, fill the cornucopias just before serving to ensure they remain delightful and crunchy—deliciousness with minimal effort!
What to Serve with Ultimate Cornucopia Charcuterie Cups
Imagine a cheerful gathering where every plate brings joy – these delightful cups set the perfect appetizer stage for a festive feast.
-
Crispy Roasted Brussels Sprouts: These savory bites provide a wonderful crunch and a touch of bitterness that contrasts beautifully with the creamy cheese in the cups. Roasting enhances their natural sweetness with a lovely caramelization.
-
Savory Butternut Squash Soup: A warm, velvety soup is the quintessential comfort food. Its sweet and savory flavor profile complements the saltiness of the meats in your cornucopia cups while offering a cozy touch to your table.
-
Garlic Breadsticks: Soft and buttery, these breadsticks add a comforting, familiar flavor. Their garlic richness enhances the overall taste experience and encourages guests to indulge.
-
Maple Glazed Carrots: Sweet yet earthy, these tender carrots create a delightful balance with the savory depths of the charcuterie cups. The glaze adds a festive shimmer that speaks volumes.
-
Green Salad with Vinaigrette: A light salad packed with seasonal greens, nuts, and fruits offers a fresh contrast to the richness of the cups. Featuring a zesty vinaigrette will bright up the palate and cleanse the taste buds between bites.
-
Mulled Wine: Warm and spiced, this comforting drink carries flavors of cinnamon and clove, making it a perfect pairing for holiday festivities. It adds a lovely aromatic element that enhances the experience of your appetizer spread.
-
Pumpkin Pie Bites: Close your feast on a sweet note with these mini desserts, which carry the comforting flavors of fall. Their spiced crust and creamy filling will leave your guests wanting more, complementing the holiday theme perfectly.
Ultimate Cornucopia Charcuterie Cups Recipe FAQs
What type of bread dough should I use for the cornucopia shells?
Absolutely! For these Ultimate Cornucopia Charcuterie Cups, I recommend using refrigerated French bread dough, as it bakes up beautifully and creates that light, crispy texture. If you can’t find it, canned pizza dough serves as a perfect substitute. It’s essential to roll it out and cut it into long, thin strips, allowing for easy wrapping around the molds.
How should I store leftover cornucopia cups?
Leftover cornucopia cups can be stored in an airtight container in the fridge for up to 3 days. To maintain their delightful crunch, I suggest filling them with meats and cheeses just before serving. Keeping the fillings separate helps ensure they don’t make the bread soggy!
Can I freeze the cornucopia shells?
The more the merrier! You can certainly prepare the cornucopia shells ahead of time. Freeze the unfilled cups in a single layer for up to 1 month. When you’re ready to use them, simply thaw in the fridge overnight, and fill them right before serving for the best texture. Just make sure not to fill before freezing, as it may compromise their crispiness!
What if my cornucopias stick to the foil mold?
Don’t worry, we can tackle that! To help prevent sticking, generously spray the aluminum foil molds with cooking spray before wrapping the dough around them. After cooking, allow the cornucopias to cool completely before gently peeling away the foil. A well-greased mold is key to a successful release!
Are there any dietary considerations I should keep in mind for my guests?
Great question! Tailoring the fillings to accommodate dietary restrictions is always a thoughtful touch. For those with nut allergies, simply omit the nuts from the filling. Additionally, if you have gluten-free guests, consider using gluten-free bread options or making the cornucopia cups with gluten-free pizza dough. Ensuring everyone can enjoy these Ultimate Cornucopia Charcuterie Cups is a beautiful way to bring everyone together!
Ultimate Cornucopia Charcuterie Cups for Your Festive Feast
Ingredients
Equipment
Method
- Roll out the refrigerated French bread dough on a lightly floured surface and cut it into long strips, about ¼ inch wide.
- Shape aluminum foil into cone-like molds for the cornucopias and generously spray each mold with cooking spray.
- Wrap dough strips around the molds, overlapping slightly for a spiral effect, and finish with a twisted rim.
- Beat the egg with a tablespoon of water and brush it over the wrapped dough.
- Preheat the air fryer to 325°F (160°C) and cook the molds for 6-7 minutes until golden brown.
- Allow the cornucopias to cool completely on a wire rack before carefully removing them from the molds.
- Fill each cornucopia with your choice of meats, cheeses, fruits, nuts, and garnish with fresh herbs.
Leave a Reply