
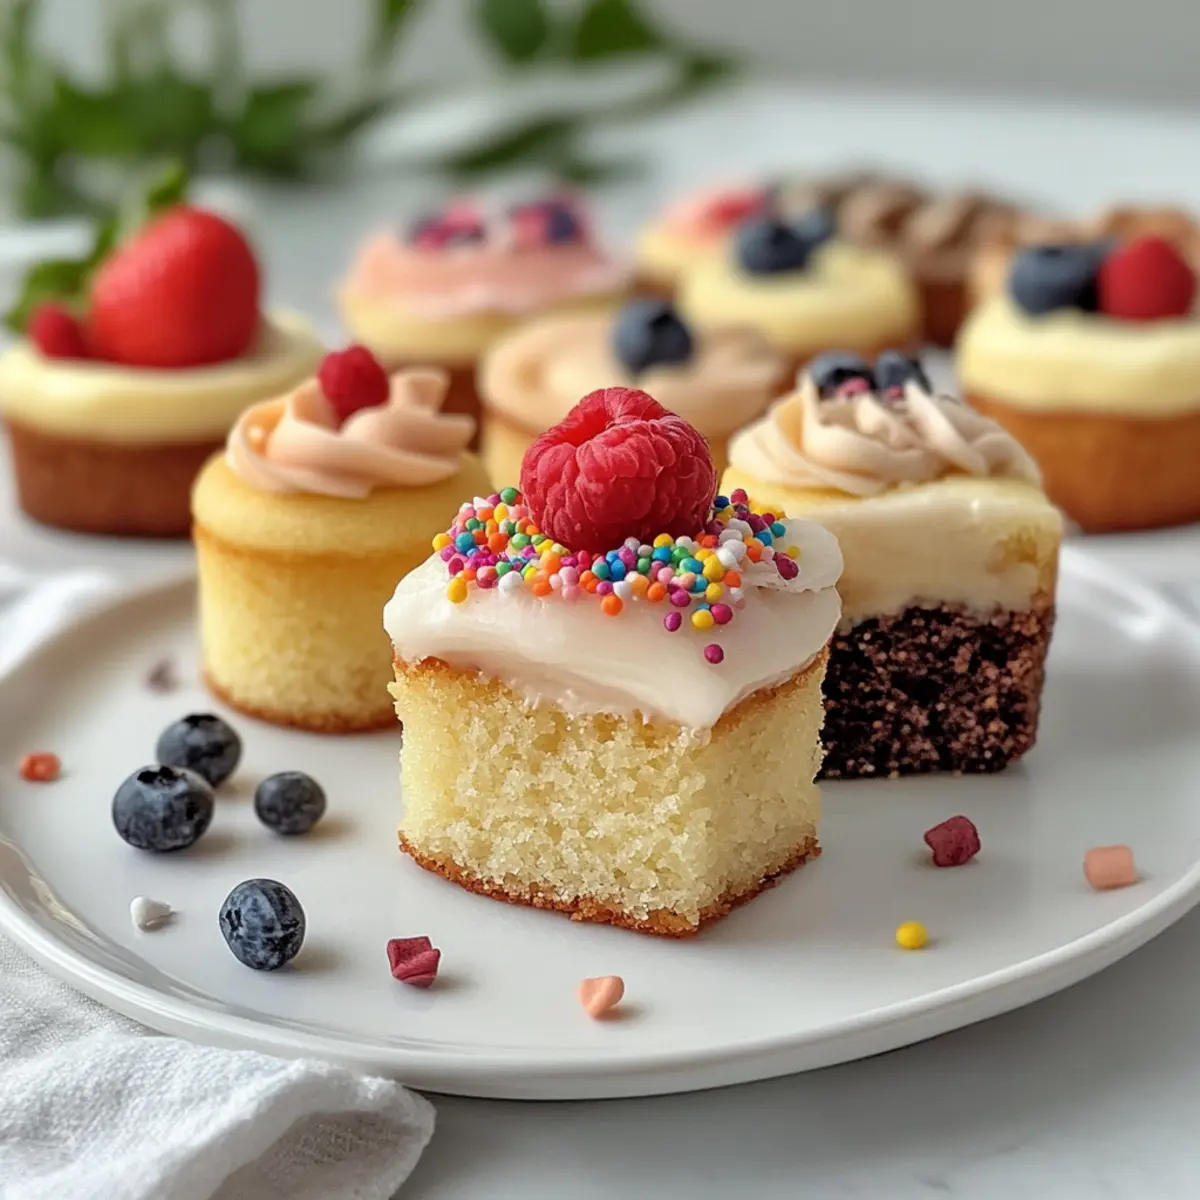
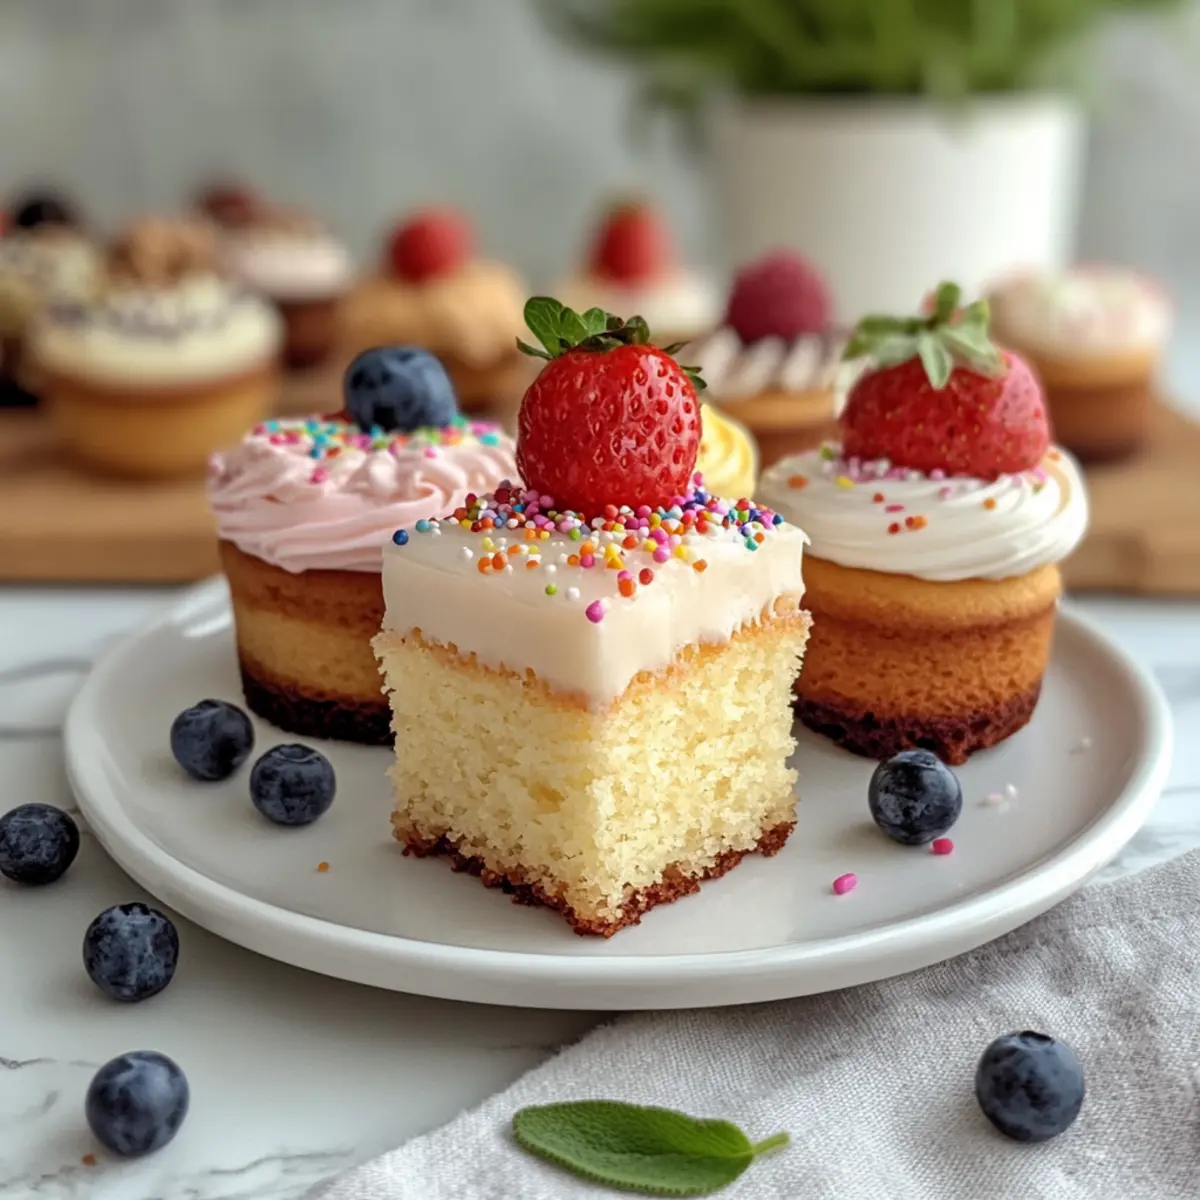
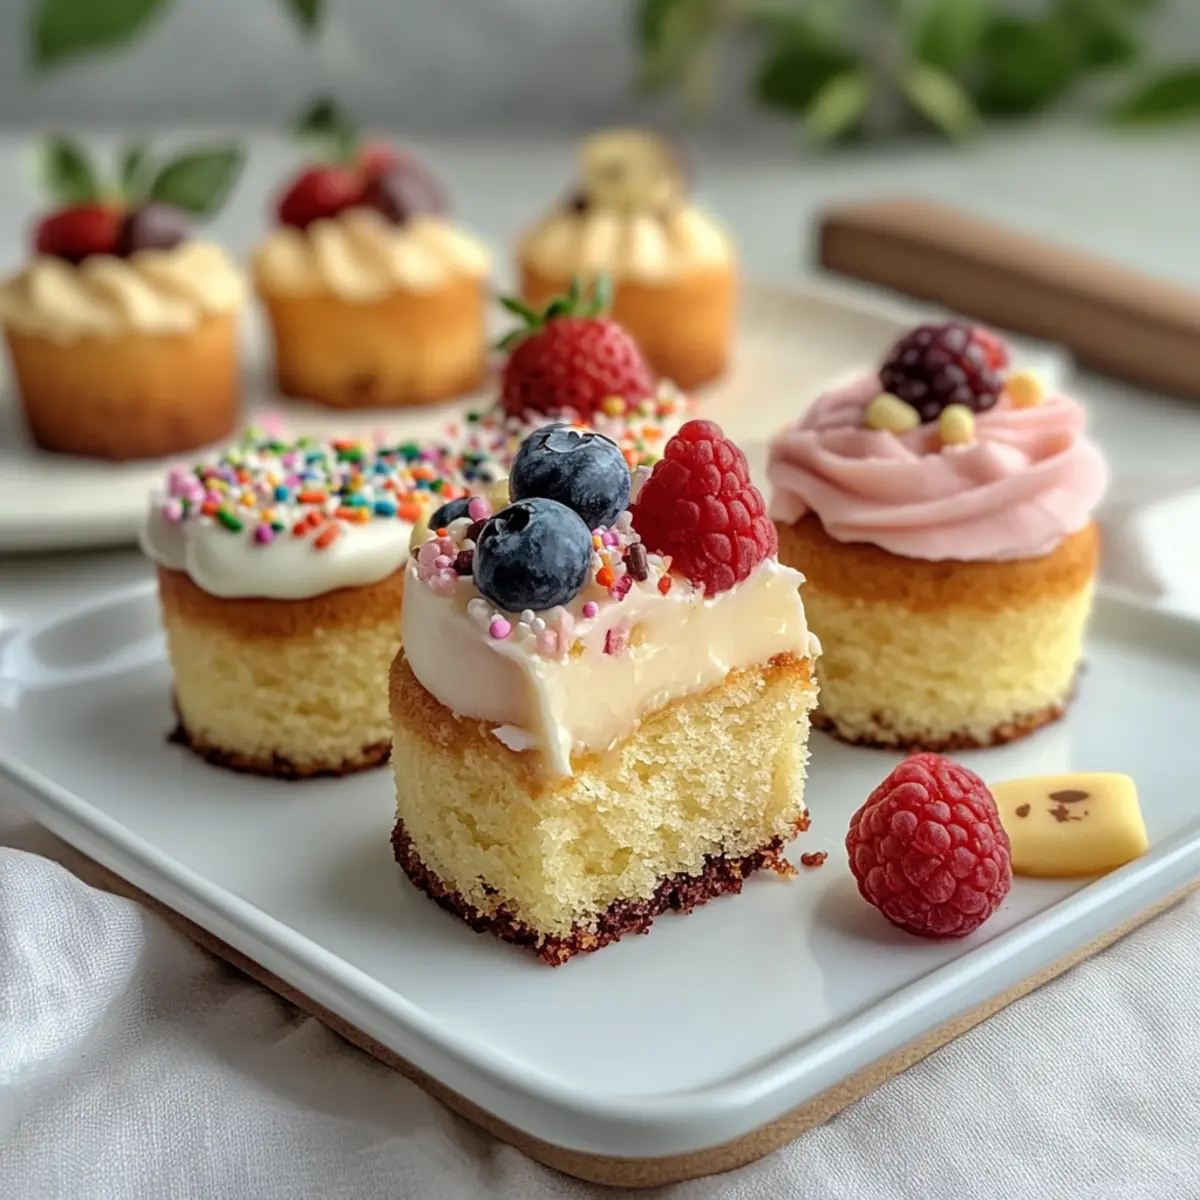
Sifting through my pantry one afternoon, I stumbled upon a bag of colorful sprinkles, which stirred a nostalgic craving for something sweet. That’s when the idea hit me: mini cakes! These delightful treats encapsulate the essence of celebration in perfectly portioned bites, making them not only easy but also incredibly versatile. Whether you’re a baking newbie or a seasoned pro, these mini cakes are a joyful way to explore flavor combinations without the fuss of dealing with larger desserts. Plus, they are perfect for serving at gatherings, offering a fun twist on classic cakes while ensuring no one feels overwhelmed by leftover slices. Intrigued? Let’s dive into the world of mini cakes and explore how these cute confections can brighten your day and impress your friends!
Why Are Mini Cakes So Irresistible?
Portion-Controlled Delight: Mini cakes are the perfect solution for those who crave dessert but want to keep it in check. These little gems treat you to sweetness without the guilt!
Easy to Customize: Whether you prefer classic vanilla, chocolate indulgence, or fruity lemon berry, you can easily switch up flavors and toppings to suit any occasion or personal taste.
Fun for Everyone: Hosting a gathering? Mini cakes add charm to your dessert table, making them a hit with guests of all ages—from kids to adults!
Quick Baking: In just 20 minutes, you can whip up a batch, giving you more time to enjoy your creations instead of being stuck in the kitchen. For more quick and delightful treats, check out Mini Lemon Poppy and Mini Chocolate Lava.
Whimsical Presentation: Glazed or topped, these mini wonders look just as impressive as their larger counterparts, creating an eye-catching dessert that’s sure to impress.
Mini Cakes Ingredients
• Here’s everything you need to create these delightful mini cakes!
For the Batter
- All-purpose Flour – Provides structure and a light texture; substitute with gluten-free flour for a gluten-free option.
- Baking Powder – Acts as a leavening agent to help cakes rise; make sure it’s fresh for optimal results.
- Salt – Enhances flavors and balances sweetness.
- Unsalted Butter – Adds richness and moisture; can be replaced with vegetable oil or margarine for dairy-free cakes.
- Granulated Sugar – Adds sweetness and helps with cake texture; brown sugar can offer a richer flavor.
- Eggs – Contributes to moisture and binds the ingredients; you can use flax eggs for a vegan alternative.
- Vanilla Extract – Infuses a sweet, aromatic flavor; almond extract can be swapped for a unique twist.
- Milk – Provides moisture; almond or coconut milk can be used for a dairy-free option.
- Cocoa Powder – Essential for chocolate mini cakes, adding a deep and rich chocolate flavor.
For the Glaze
- Powdered Sugar – Forms the base of the glaze; for extra flavor, consider vanilla or almond extract.
- Milk – Helps achieve the perfect glaze consistency; swap with almond milk for a non-dairy version.
By collecting these simple yet essential ingredients, you are all set to embark on your mini cake baking adventure!
Step‑by‑Step Instructions for Mini Cakes
Step 1: Preheat and Prepare
Begin by preheating your oven to 350°F (175°C) while you prepare your mini cake pans. Grease the pans well with butter or non-stick spray to prevent any sticking later on. If you want to add a little flair, consider lining the bottoms with parchment paper for easy removal. This step is crucial for ensuring your delicious mini cakes slide out effortlessly!
Step 2: Whisk Dry Ingredients
In a medium bowl, whisk together 1 ½ cups of all-purpose flour, 1 ½ teaspoons of baking powder, and ¼ teaspoon of salt. Make sure to mix these dry ingredients thoroughly to ensure the baking powder is evenly distributed. This dry mix is the foundation for fluffy mini cakes that rise beautifully. Set aside the bowl for the next step, as these ingredients are essential for their delightful texture.
Step 3: Cream Butter and Sugar
In a large mixing bowl, beat together ½ cup of unsalted butter and 1 cup of granulated sugar until the mixture is light and fluffy, about 3-4 minutes. This process is essential for incorporating air, allowing your mini cakes to achieve a delightful rise. The sugars should dissolve, and you’ll notice a pale color change in the mixture, which indicates that it’s time to move on to the next step.
Step 4: Add Eggs and Vanilla
Next, add 2 large eggs to the butter-sugar mixture, one at a time, mixing well after each addition. Follow this by pouring in 2 teaspoons of vanilla extract. This step will enrich the flavor profile of your mini cakes and contribute to their moistness. Be sure to scrape down the sides of the bowl to incorporate all ingredients evenly, ensuring every bite is delicious.
Step 5: Combine Wet and Dry Ingredients
Gradually mix in the dry ingredients, alternating with ½ cup of milk, beginning and ending with the dry ingredients. Stir gently just until the batter is combined; over-mixing can lead to dense cakes. You are aiming for a smooth and thick batter that can be easily spooned into the prepared pans. This balance of dry and wet components is what will make your mini cakes both moist and flavorful.
Step 6: Optional Chocolate Variation
If making chocolate mini cakes, sift in ½ cup of cocoa powder along with the dry ingredients. Additionally, add ½ cup of hot coffee to the batter after mixing. The warmth of the coffee enhances the chocolate flavor, providing a rich and delicious twist to your mini cakes. Continue mixing until everything is combined, ensuring no dry patches remain.
Step 7: Fill and Bake
Spoon the batter into the prepared mini cake pans, filling each about 2/3 full to allow for rising. Place the pans in the preheated oven and bake for 15-20 minutes. Keep a close eye on them and use a toothpick to check for doneness—insert it into the center, and it should come out clean or with a few moist crumbs attached.
Step 8: Cool and Transfer
Once baked, remove the mini cakes from the oven and let them cool in the pans for about 10 minutes. This cooling period allows them to set without falling apart. After 10 minutes, carefully transfer the cakes to a wire rack to cool completely. This step is vital for achieving the best texture and flavor in your mini cakes before adding any toppings or glazes.
Step 9: Add Glaze or Ganache
Finally, prepare a simple glaze by mixing 1 cup of powdered sugar with 2-3 tablespoons of milk and a splash of vanilla extract. Drizzle it over the cooled vanilla mini cakes. For chocolate mini cakes, consider a rich ganache made with melted chocolate and cream. This final touch not only adds sweetness but also elevates the presentation, making your mini cakes irresistible!
Expert Tips for Mini Cakes
-
Quality Ingredients: Use high-quality, fresh ingredients for the best flavors. This is especially important for butter and vanilla extract.
-
Don’t Overmix: Over-mixing the batter can lead to dense mini cakes. Gently combine your ingredients until just mixed for a light texture.
-
Check Early: Mini cakes bake faster than larger ones. Start checking for doneness around the 12-minute mark to avoid dryness.
-
Pan Prep: Use well-greased non-stick pans or line them with parchment paper. This ensures your mini cakes come out easily and maintain their lovely shapes.
-
Glaze Timing: Allow mini cakes to cool completely before glazing. This step prevents the glaze from melting and ensures a beautiful finish.
-
Flavor Pairings: Get creative! Pair mini cakes with seasonal fruits, flavored glazes, or even spices for a unique twist on traditional recipes.
Make Ahead Options
These mini cakes are perfect for meal prep, saving you precious time during busy weeknights! To prepare ahead, you can mix the batter and store it in the refrigerator for up to 24 hours; this helps enhance the flavors while keeping the ingredients fresh. Additionally, the baked mini cakes can be kept in an airtight container at room temperature for up to 3 days, or frozen for up to three months—just ensure they’re completely cooled before sealing them to maintain their moisture. When you’re ready to serve, simply glaze or ganache them and enjoy delicious mini cakes that taste just as delightful as if they were freshly baked!
Storage Tips for Mini Cakes
-
Room Temperature: Store mini cakes in an airtight container at room temperature for up to 3 days. This keeps them fresh and ready for snacking!
-
Fridge: If you prefer, you can store them in the fridge for up to 5 days. Just make sure they are in a sealed container to avoid drying out.
-
Freezer: Freeze mini cakes for up to 3 months. Wrap each cake individually in plastic wrap and place them in a freezer-safe bag. Thaw at room temperature when ready to enjoy!
-
Reheating: To rejuvenate the flavor, briefly warm mini cakes in the microwave for 10-15 seconds. Enjoy these delightful mini cakes whenever the craving strikes!
What to Serve with Mini Cakes?
Inviting guests or simply treating yourself? Pairing mini cakes with delightful accompaniments elevates your dessert experience!
- Fresh Berries: Juicy strawberries or blueberries provide a burst of freshness that complements the sweetness of mini cakes beautifully.
- Whipped Cream: A dollop of homemade whipped cream adds lightness and a creamy texture, making every bite feel indulgent.
- Ice Cream: Vanilla or chocolate ice cream creates a rich, creamy contrast to the delicate cake, perfect for a cozy dessert experience.
- Fruit Compote: Drizzle a warm berry compote over your mini cakes for a tangy-sweet kick that enhances the flavors and adds elegance.
- Coffee or Tea: Serving mini cakes with a hot cup of coffee or herbal tea creates a comforting afternoon treat, enhancing rich flavors in each sip.
- Chocolate Sauce: A drizzle of warm chocolate sauce transforms your mini cakes into a decadent treat, making them utterly irresistible for chocolate lovers.
- Mini Cheesecakes: Offering mini cheesecakes as a side allows guests to choose between two delightful desserts, providing variety and excitement.
- Sparkling Water: A refreshing glass of sparkling water can cleanse the palate, balancing sweetness without overpowering the dessert.
- Seasonal Fruits: Serve mini cakes alongside seasonal fruits like peaches or cherries to add a burst of natural sweetness and color to your plate.
Mini Cakes: Customize and Enjoy!
Feel free to unleash your creativity and make this mini cakes recipe uniquely yours with delightful variations.
- Gluten-Free: Substitute all-purpose flour with your favorite gluten-free blend for a deliciously inclusive option.
- Dairy-Free: Swap unsalted butter and milk for coconut oil or almond milk to make your mini cakes dairy-free and just as delightful.
- Flavor Enhancements: Add citrus zest, like lemon or orange, for a bright twist in your batter and boost the flavor profile wonderfully.
- Nutty Indulgence: Fold in chopped nuts like walnuts or pecans for satisfying texture and a nutty flavor that balances sweetness perfectly.
- Fruit-Infused: Incorporate fresh or frozen fruits, such as berries or bananas, for natural sweetness and a burst of flavor in every bite.
- Spiced Delight: Mix in spices such as cinnamon or nutmeg to awaken your taste buds and give your mini cakes a warm, cozy feel.
- Frosting Variations: Experiment with different frosting options like cream cheese or peanut butter frosting to add an extra layer of richness to your mini cakes.
- Chocolate Lovers: For extra chocolaty goodness, drizzle melted chocolate or ganache over your mini cakes, making them irresistibly decadent.
With all these twists and swaps, you can always find the perfect mini cake for any occasion! Want more sweet surprises? Don’t miss out on trying Mini Chicken Pot for savory goodness or check out Baked Mini Hasselback for a delightful side dish to balance out those sweets!
Mini Cakes Recipe FAQs
What type of flour should I use for mini cakes?
I recommend using all-purpose flour for the best structure and texture. If you need a gluten-free option, substitute with a gluten-free flour blend, which works just as well in creating delightful mini cakes!
How long can I store mini cakes?
Store your mini cakes in an airtight container at room temperature for up to 3 days. If you prefer them chilled, you can keep them in the fridge for up to 5 days. Just ensure they’re sealed properly to maintain their moisture.
Can mini cakes be frozen?
Absolutely! To freeze mini cakes, wrap each one individually in plastic wrap and place them in a freezer-safe bag. They can be frozen for up to 3 months. When you’re ready to enjoy them, simply thaw at room temperature or pop them in the microwave for 10-15 seconds to warm them up.
What should I do if my mini cakes are dry?
If your mini cakes turn out dry, it may be due to overbaking or over-mixing the batter. To prevent this, check for doneness at around 12 minutes and avoid mixing the batter too much. If they’re already baked, consider serving them with a drizzle of glaze or whipped cream to add moisture back in!
Can I make mini cakes dairy-free or vegan?
Yes! You can easily make mini cakes dairy-free by substituting unsalted butter with vegetable oil or margarine, and using almond or coconut milk instead of regular milk. For a vegan option, replace the eggs with flax eggs (1 tablespoon of ground flaxseed mixed with 3 tablespoons of water for each egg) and follow the same baking instructions.
What kinds of toppings can I use on my mini cakes?
Get creative with toppings! You can drizzle a simple glaze made from powdered sugar and milk, or use ganache for a richer chocolate flavor. Fresh fruits, nuts, or even flavored whipped cream can elevate your mini cakes and offer delightful variations!

Mini Cakes: Delightful Bites for Your Sweet Cravings
Ingredients
Equipment
Method
- Preheat your oven to 350°F (175°C) and prepare mini cake pans by greasing them well.
- In a medium bowl, whisk together the flour, baking powder, and salt.
- In a large mixing bowl, beat together the unsalted butter and sugar until light and fluffy.
- Add the eggs one at a time, mixing well after each addition, followed by the vanilla extract.
- Gradually mix in the dry ingredients, alternating with milk.
- For chocolate mini cakes, sift in cocoa powder and add hot coffee.
- Spoon the batter into prepared mini cake pans, filling each about 2/3 full.
- Bake for 15-20 minutes, checking for doneness with a toothpick.
- Let the mini cakes cool in the pans for 10 minutes, then transfer to a wire rack.
- Prepare the glaze by mixing powdered sugar, milk, and vanilla extract, then drizzle over cooled cakes.
Leave a Reply