
The sun sparkled overhead as I stood in my kitchen, surveying a warm afternoon filled with the sweet aroma of ripe bananas. It was time to whip up a nostalgic favorite: No-Bake Banana Pudding Pie with Caramel Drizzle. This dish marries creamy banana pudding and a luscious caramel topping, crafting the perfect treat for any occasion. Best of all, it’s a breeze to prepare and make ahead, making it a go-to crowd-pleaser for summer potlucks and family gatherings. The chilled, fluffy layers evoke charming memories of classic Southern desserts, and I can barely wait to share it with my family and friends. Are you ready to discover how to create this delightful dessert? Let’s dive in!

Why is This Banana Pudding Pie a Must-Try?
Easy Preparation: This no-bake dessert requires minimal effort, making it perfect for both novice and seasoned cooks.
Nostalgic Flavors: Combining creamy banana pudding with a rich caramel drizzle transports you to childhood memories of summer gatherings.
Versatile Options: With variations like gluten-free crusts and different pudding flavors, everyone can enjoy this treat.
Crowd-Pleaser: This pie is a guaranteed hit at potlucks, reminiscent of classic Southern desserts that everyone loves.
Make-Ahead Convenience: Prepare it a day prior and simply chill, allowing flavors to meld beautifully before serving.
Try pairing this with a refreshing Southern Banana Cobbler for an unforgettable dessert spread!
Banana Pudding Pie Ingredients
• Here’s what you’ll need for a delectable Banana Pudding Pie!
For the Pudding Layer
- Instant Vanilla Pudding – Provides creaminess and sweetness; feel free to swap in banana pudding for an even stronger banana flavor.
- Milk – Hydrates and activates the pudding mix; 1 ½ cups recommended, though not suitable for non-dairy substitutes unless specified.
- Cool Whip (or whipped topping) – Adds fluffiness to the pie; can be substituted with homemade whipped cream for a personal touch.
For the Fruit Layer
- Bananas – Fresh fruit adds natural sweetness; toss with lemon juice to prevent browning and keep them vibrant.
For the Crust
- Vanilla Wafers – Offers a delightful crunch and flavor every bite; alternatives include graham cracker or chocolate cookie crusts if you wish to mix it up.
For the Topping
- Caramel Sauce – Enhances richness and adds a gourmet touch; choose quality store-bought or homemade that has a lovely thickness.
These ingredients come together beautifully in this easy, no-bake Banana Pudding Pie, promising to be a favorite at your next gathering!
Step‑by‑Step Instructions for Banana Pudding Pie
Step 1: Prepare the Crust
If you’re using a pre-made crust, you can skip this step. For a homemade vanilla wafer crust, preheat your oven to 350°F (175°C). Crush 2 cups of vanilla wafers and combine them with ½ cup of melted butter. Press the mixture evenly into a 9-inch pie pan. Bake for about 10 minutes until golden brown, then allow it to cool completely before adding the filling.
Step 2: Mix Pudding
In a large mixing bowl, whisk together the instant vanilla pudding mix and 1 ½ cups of cold milk until smooth, about 2 minutes. Watch as it thickens to a creamy consistency. It’s essential to use cold milk for proper setting. Let the mixture sit for 5 minutes so it can firm up before proceeding to the next step.
Step 3: Combine with Cool Whip
Once your pudding mixture is thickened, gently fold in 2 cups of Cool Whip. Use a spatula and a gentle lifting motion to maintain the light and airy texture. The goal is a beautifully blended, fluffy filling for your Banana Pudding Pie. Mix until no streaks remain, creating a luscious blend of flavors.
Step 4: Layer the Pie
Begin layering your pie by placing a layer of banana slices in the cooled crust, overlapping them slightly. Next, pour half of the creamy pudding mixture over the bananas and spread it evenly. Repeat the process with another layer of banana slices followed by the remaining pudding mixture, ensuring even distribution throughout for a delightful presentation.
Step 5: Chill
Cover your Banana Pudding Pie with plastic wrap or a lid, and refrigerate it for at least 2 hours, preferably overnight. This allows the flavors to meld beautifully while the pudding sets to a perfect, sliceable consistency. When set, the pie should feel slightly firm to the touch and retain a lovely, creamy texture.
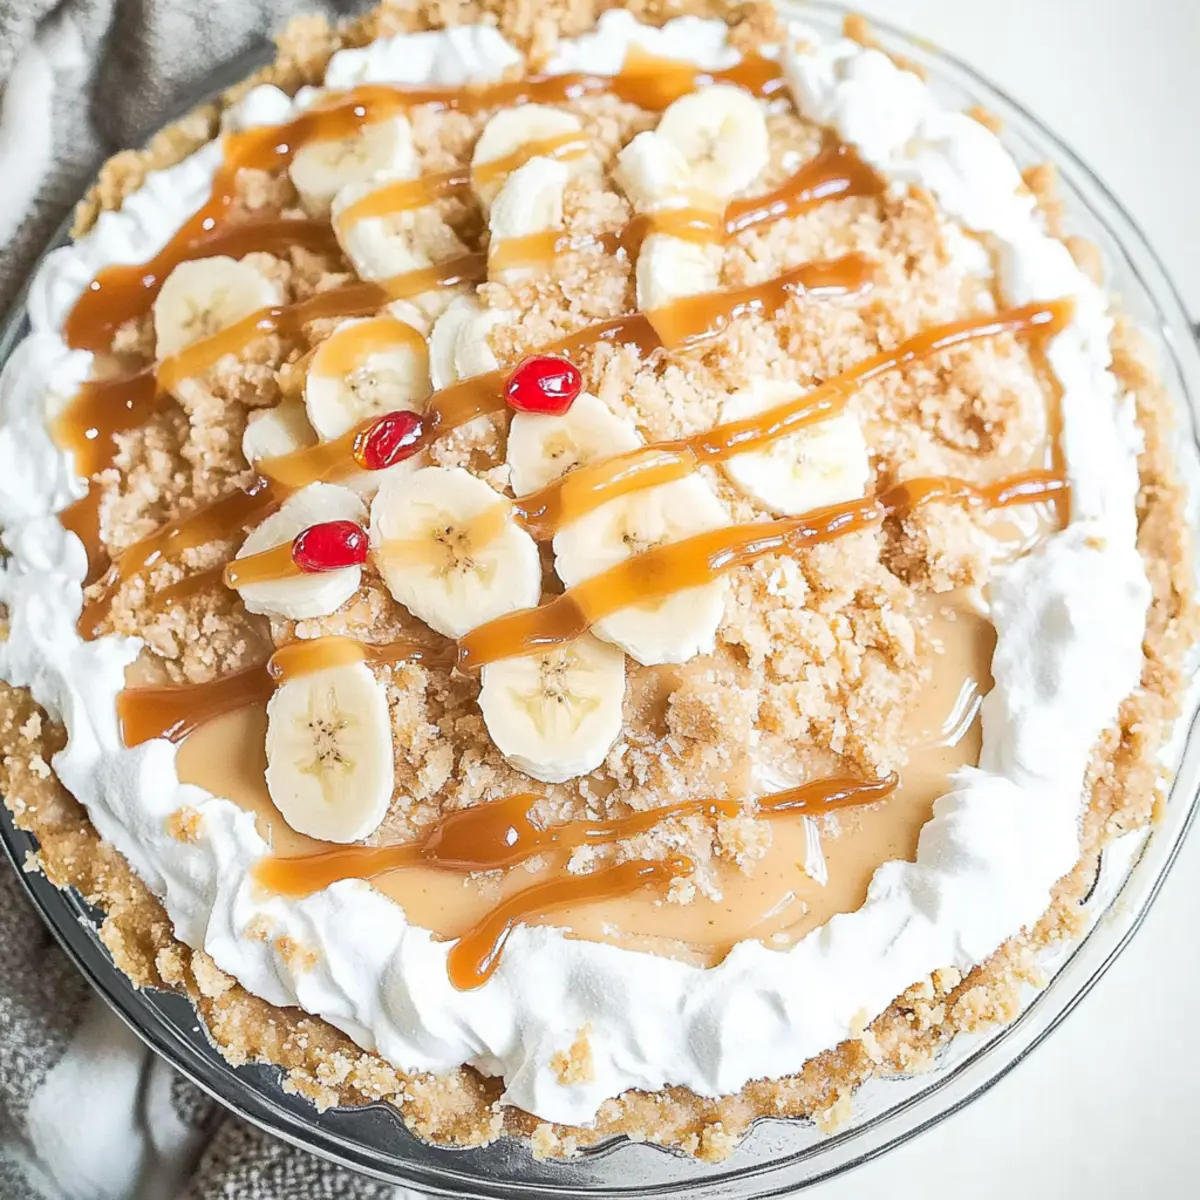
Step 6: Add Toppings
At serving time, remove the pie from the refrigerator and drizzle a generous layer of caramel sauce on top. For added texture and flavor, garnish with extra vanilla wafers around the edges or on top for a charming presentation. Delight in the rich, sweet aroma as you prepare to serve this classic dessert to your family and friends.

Expert Tips for Banana Pudding Pie
Use Cold Milk: Always start with cold milk when mixing pudding to ensure it sets properly and achieves the right creamy texture.
Prevent Browning: To keep your banana slices looking fresh, either coat them with pudding mixture right away or toss in lemon juice to prevent oxidation.
Layer Smart: For an attractive presentation, alternate layers of bananas and pudding evenly, ensuring every slice reveals the delightful pattern of both.
Avoid Kitchen Mishaps: If using homemade pudding, cool it before folding in Cool Whip; otherwise, you might end up with a soupy consistency that won’t set well.
Skip the Freezer: Avoid freezing the Banana Pudding Pie, as it can change the texture of both the pudding and the bananas, leading to a less enjoyable dessert.
Make It Yours: Feel free to experiment with different crusts or pudding flavors to customize your Banana Pudding Pie to your family’s taste preference!
Banana Pudding Pie Variations & Substitutions
Feel free to let your creativity shine as you customize this delightful Banana Pudding Pie to match your taste preferences and dietary needs!
-
Gluten-Free Crust: Use a gluten-free cookie or almond meal crust for a guilt-free version. This swap allows everyone to indulge without worry!
-
Dairy-Free Delight: Replace regular milk with almond milk and Cool Whip with your favorite non-dairy whipped topping, making it friendly for lactose-sensitive guests. Enjoy the same creamy texture without the dairy!
-
Pudding Flavors: Experiment with chocolate pudding for a luscious twist, or try butterscotch for a warm, caramel-like flavor profile. Mixing flavors can take you to dessert paradise!
-
Enhanced Flavor: Add a teaspoon of vanilla extract or a sprinkle of cinnamon to the pudding mixture for a warm, comforting taste. This little boost can elevate your dessert to the next level!
-
Banana Alternatives: Substitute ripe bananas with diced strawberries or peaches for a fruity twist. You’ll discover an entirely new dessert that bursts with fresh flavors inviting summer vibes!
-
Caramel Drizzle: Swap your traditional caramel with a rich chocolate sauce if you’re a chocoholic, or drizzle a salted caramel for a delightful contrast that balances sweetness perfectly.
-
Crunchy Topping: Top the pie with crushed nuts or toffee bits for an added crunch factor. This new layer of texture can create a delightful surprise in every bite!
Pair your personalized Banana Pudding Pie with a serving of Sweet Potato Pie for a comforting combo that delights your guests!
Make Ahead Options
These Banana Pudding Pies are a fantastic choice for busy home cooks looking to save time without sacrificing flavor! You can prepare the pudding and crust up to 24 hours in advance. To do this, simply mix the pudding and Cool Whip, layer the bananas, and fill the crust as instructed, then cover tightly with plastic wrap and refrigerate. For best results, wait to add the caramel drizzle and any garnishes until right before serving to maintain freshness and texture. This way, you’ll enjoy the same delicious flavors without the last-minute stress—just as delightful, we promise!
How to Store and Freeze Banana Pudding Pie
Fridge: Keep your Banana Pudding Pie tightly covered with plastic wrap in the refrigerator for up to 3 days to maintain freshness and texture.
Make-Ahead: This pie can be made a day in advance; allowing it to set overnight enhances the flavors without losing quality.
Avoid Freezing: Freezing is not recommended, as it changes the texture of the pudding and bananas, resulting in an unappealing mush.
Reheating: This dessert is best served chilled, so no reheating is necessary; simply enjoy its delicious, creamy layers straight from the fridge!
What to Serve with Banana Pudding Pie with Caramel Drizzle
The perfect meal isn’t complete without delightful sides and drinks that elevate your dessert experience.
-
Fresh Fruit Salad: A medley of seasonal fruits brings a refreshing contrast, balancing the creamy sweetness of the pie.
-
Southern Buttermilk Biscuits: Flaky, buttery biscuits add a comforting, savory element that pairs beautifully with dessert.
-
Classic Mint Tea: The refreshing mint notes in sweet iced tea enhance the flavors, creating a delightful Southern vibe.
-
Chocolate Ice Cream: Rich and creamy chocolate ice cream provides a decadent contrast to the light banana pudding pie.
-
Cinnamon Sugar Donuts: Soft, fluffy donuts sprinkled with cinnamon sugar offer a delightful crunch and flavor complement to the pie.
-
Lemonade: Tangy lemonade brightens every bite, cleansing the palate and making for a refreshing pairing on warmer days.
Pairing these sides and drinks alongside your Banana Pudding Pie will create a fabulous spread that friends and family will adore!

Banana Pudding Pie Recipe FAQs
What ripeness of bananas should I use?
For the best flavor and texture, choose ripe bananas that are still firm, with a few small brown specks. Avoid overly ripe bananas that have dark spots all over as they may be too mushy, impacting your pie’s consistency.
How should I store Banana Pudding Pie?
Store your Banana Pudding Pie tightly covered with plastic wrap in the refrigerator for optimal freshness. It can last up to 3 days but is best enjoyed within 2 to ensure the bananas remain firm and delightful.
Can I freeze Banana Pudding Pie?
I wouldn’t recommend freezing it, as freezing alters the texture of both the pudding and the bananas, leading to a mushy outcome. However, if you do want to freeze it, ensure that you wrap it tightly in plastic wrap and aluminum foil, but remember to use it within 1 month for the best quality when thawed.
What if my pudding doesn’t thicken properly?
If your pudding mixture isn’t thickening, it could be due to using warm milk. Always opt for cold milk and whisk vigorously for 2 minutes. If it still doesn’t set, let it sit for 5 minutes and whisk again; if it remains runny, you might need to mix in a touch of instant pudding powder to help it along.
Are there any dietary considerations for this recipe?
Absolutely! For a gluten-free Banana Pudding Pie, substitute the vanilla wafers with gluten-free graham crackers or cookie alternatives. If you need a dairy-free version, opt for almond milk and dairy-free whipped topping. Always check your ingredient labels to avoid allergens.
Can I prepare the Banana Pudding Pie in advance?
Yes, this pie is perfect for make-ahead! You can prepare it a day before your event. Just ensure it is covered and stored in the refrigerator for at least 2 hours, preferably overnight, to allow all the flavors to meld together beautifully before serving.
Creamy Banana Pudding Pie: A No-Bake Southern Delight
Ingredients
Equipment
Method
- Preheat your oven to 350°F (175°C). Crush 2 cups of vanilla wafers and combine them with ½ cup of melted butter. Press the mixture evenly into a 9-inch pie pan. Bake for about 10 minutes until golden brown, then allow it to cool completely.

- In a large mixing bowl, whisk together the instant vanilla pudding mix and 1 ½ cups of cold milk until smooth, about 2 minutes. Let the mixture sit for 5 minutes to firm up.
- Gently fold in 2 cups of Cool Whip into the pudding mixture until fully combined and fluffy.
- Layer banana slices in the cooled crust, pour half of the pudding mixture over, then repeat with another layer of bananas and the remaining pudding mixture.
- Cover the pie and refrigerate for at least 2 hours, preferably overnight.
- Drizzle caramel sauce over the pie when serving and garnish with extra vanilla wafers.
Leave a Reply